9 Photography Composition Techniques for Jaw-dropping Photos
Learn the secrets in taking stunning travel photos with your iPhone and uncover techniques for next-level photography.
Have you ever found yourself in awe of stunning travel photos and wondered how you could capture similar breathtaking moments with your iPhone? Look no further, as we’re here to unlock the secrets of transforming your travel photography into a work of art.
Speaking of art, photography itself is a form of artwork and we, the artists. As such, even in photography there are some things that we can do to make the photos we take much more impactful. What am I talking about? “Photography Composition.”
Photography has played a huge part in my life and it’s one of the things I’m really passionate about. It goes so well with traveling as I’m sure you know. All of my original photos here on the blog were just taken by an iPhone 11, including the home page! So I don’t think it’s the expensive cameras that create wonderful photos, it’s the person behind the camera.
We all have the ability to create works of art and we can achieve that through photography composition. (Actually, a lot of the composition techniques were used by some of the greatest artists in the world such as Da Vinci!)
Sure, editing and photography techniques also play a huge role in capturing the essence of the moment but through photography composition, you can transform your travel photos from ordinary to extraordinary.
In this article, I’ll be sharing with you some of my favorite photography composition techniques with plenty of tips to help you get started! I’ll also include my original travel photos to give you a better understanding on how they work.
Photography composition refers to the arrangement and placement of elements within a photograph to create a visually appealing and impactful image.
It involves making deliberate choices about framing, perspective, balance, symmetry, lines, colors, and other compositional techniques to capture attention and convey the desired message or emotion.
Now before you start panicking about all these factors, don’t sweat it. We all start from somewhere and you can simply take what resonates with you in this article to try them out.
Composition is a fundamental aspect of photography that allows you to guide the viewer’s eye, create a sense of harmony, emphasize the subject, and tell a compelling visual story. It goes beyond the technical aspects of capturing an image and focuses on the artistic and creative decisions that shape the final photograph.
Afterall, a picture is worth a thousand words… so what’s your story?
9 Photography Composition Techniques to Take Stunning Travel Photos with the iPhone
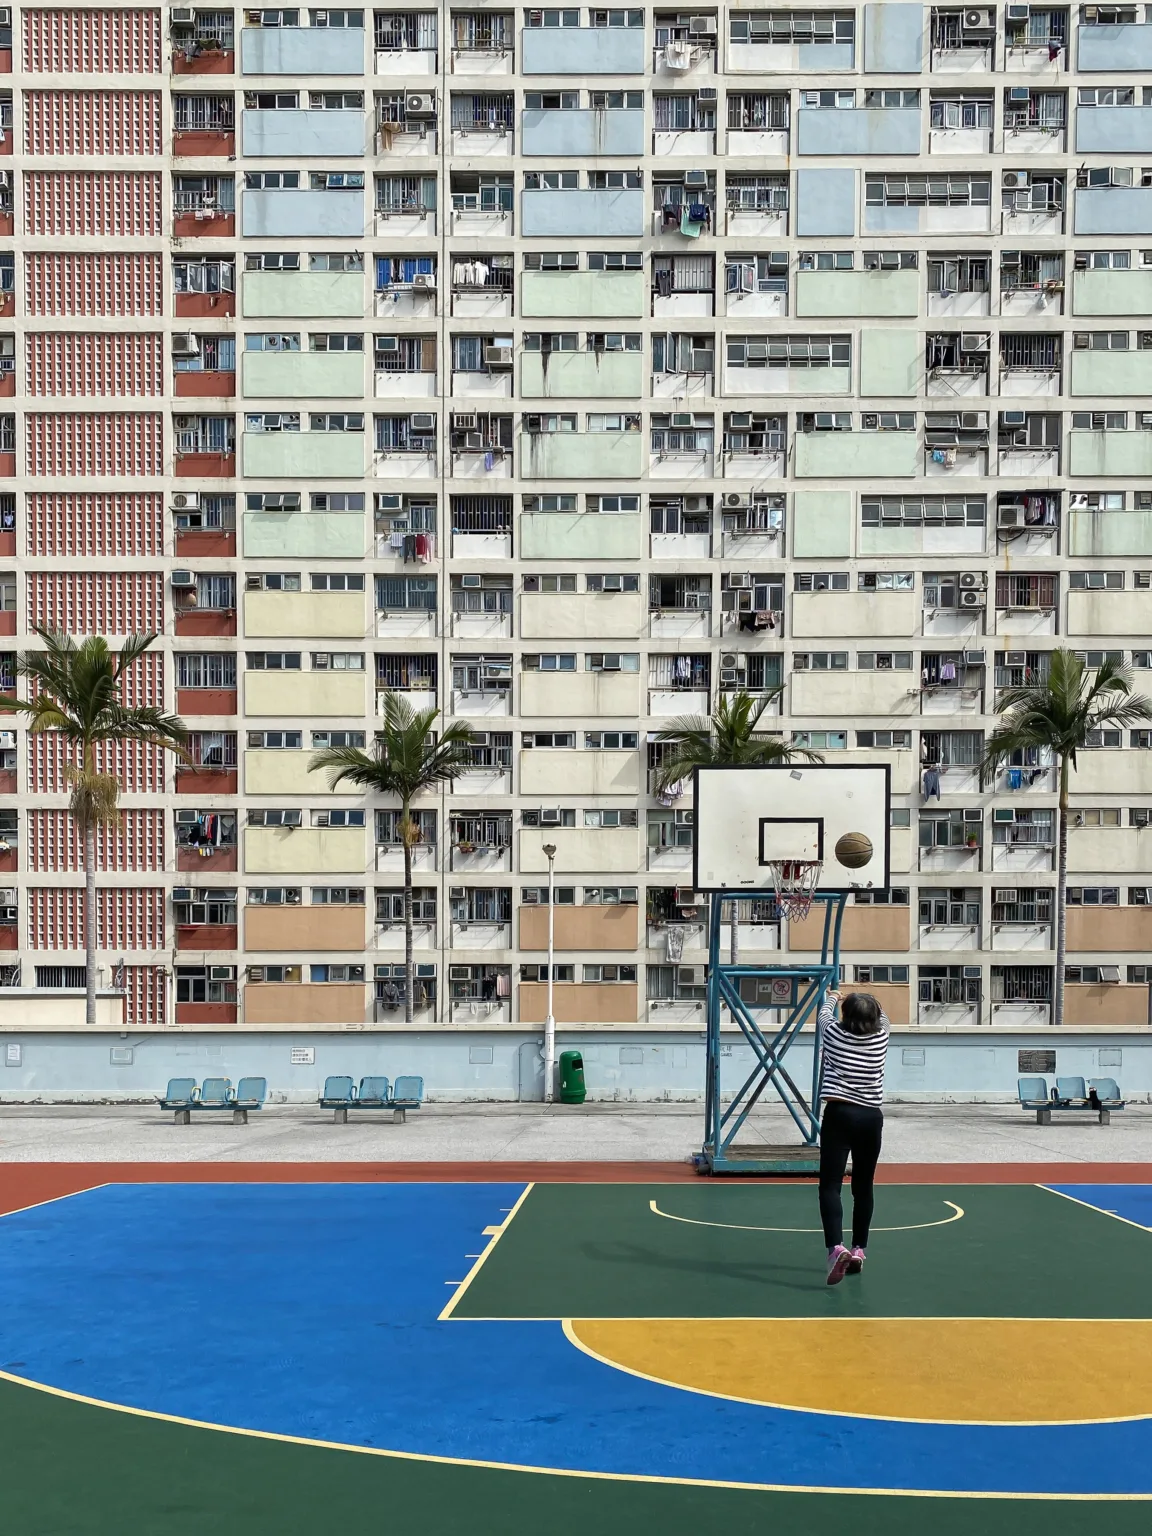
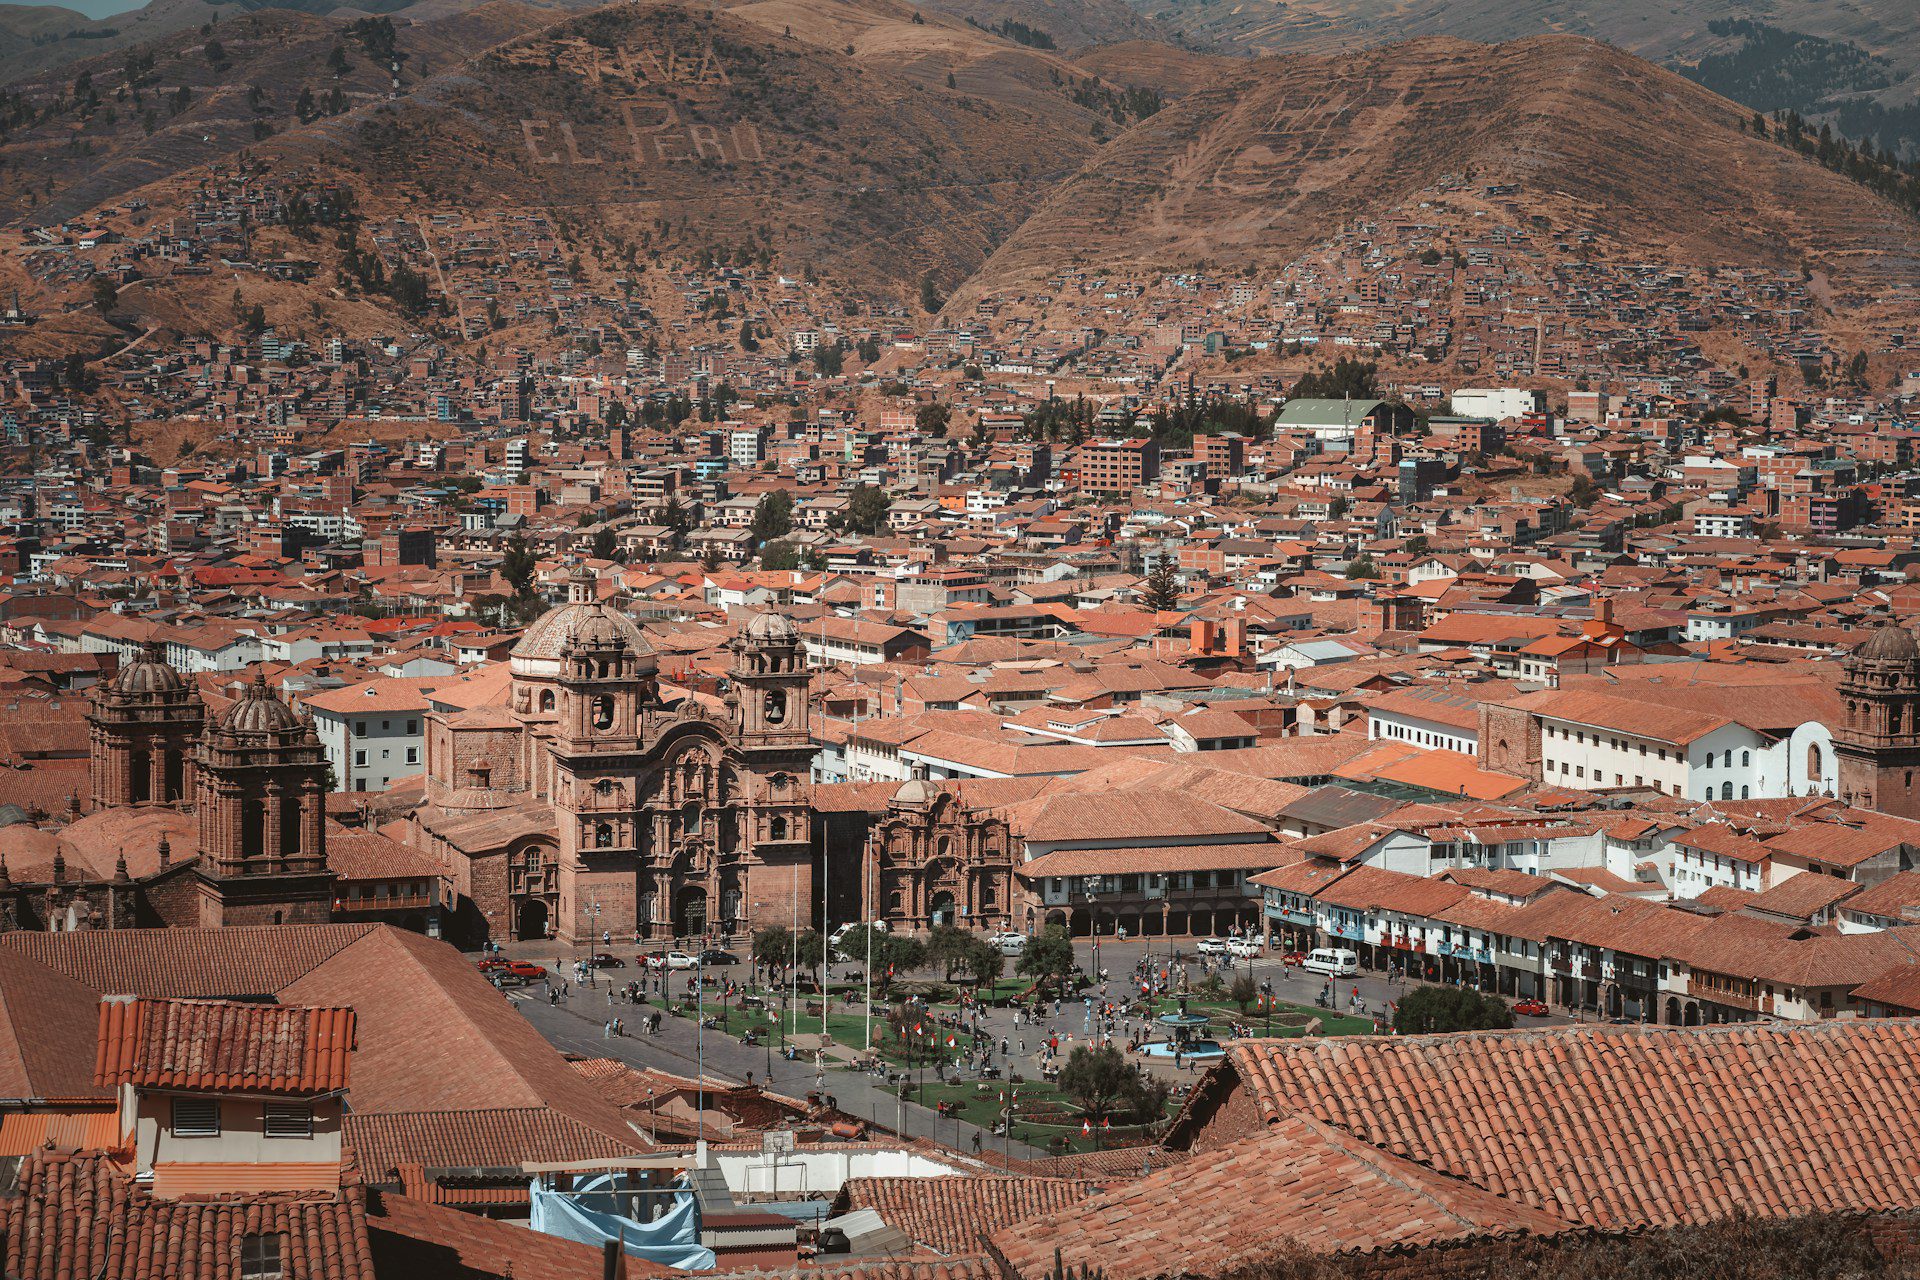
Kowloon, Hong Kong
1. Rule of Thirds
One of my favorite composition techniques and one that I’m sure you might have heard of before. We usually like to put the subject in the center when we take photos but doing so actually makes for a static and less engaging photograph.
The Rule of Thirds involves dividing the image into a grid of nine equal parts using two horizontal and two vertical lines, just like a tic-tac-toe board. The Rule of Thirds is based on the idea that our eyes are naturally drawn to these intersection points and the lines themselves. Placing your subject along these lines or at the intersections creates a visual flow and helps draw the viewer’s attention to the most important elements in your photo.
You can use activate this grid on your iPhone by going to Settings > Camera > Composition > Grid. I recommend turning it on and keeping it on!
Rule of Thirds Grid on the iPhone
As long as your subject is touching any one of those lines, it creates a more visually balanced and dynamic composition.
The intersections of the grids are called “Power Points.” Placing your subject on this area makes for a much more impactful shot. For example, the woman shooting the basketball is exactly in the lower right power point, as well as the hoop and the ball!
That shot was taken in Choi Hung Estate in Kowloon, Hongkong in case you’re wondering.
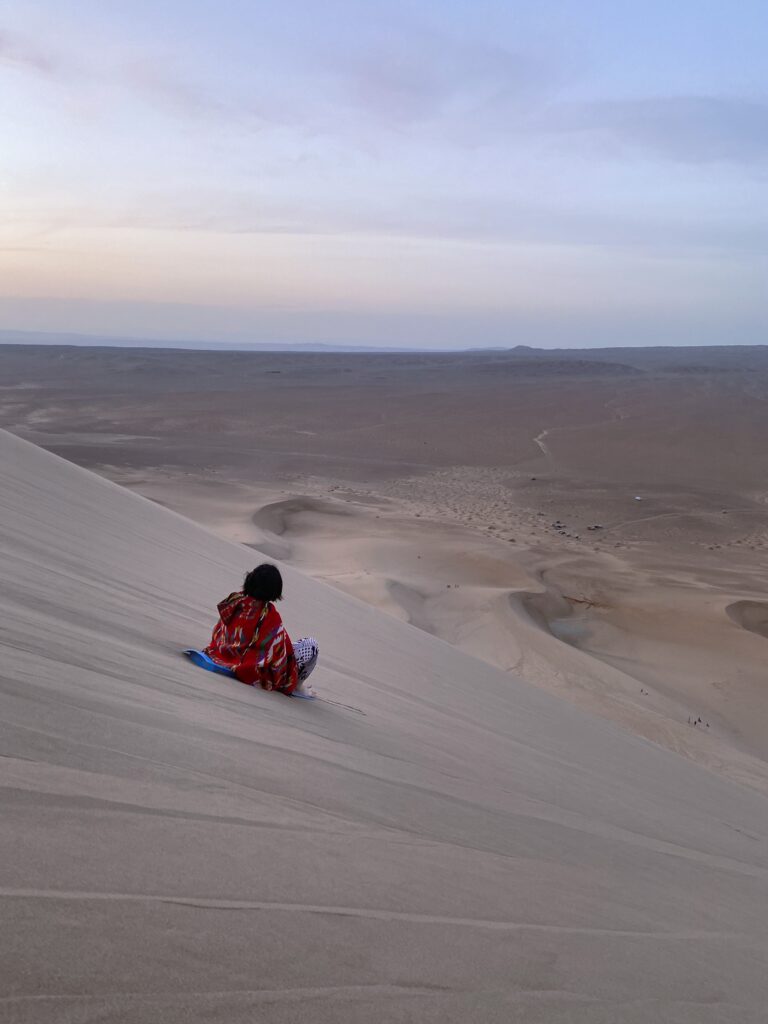
Khongoryn Els, Mongolia
Wadi Rum, Jordan
Same thing with the woman sitting on the sand dunes of Mongolia’s Gobi desert. I’ve positioned her touching the left lines, her red poncho adds such a pop to the otherwise bleak desert.
The Bedouin tent in Jordan’s Wadi Rum Desert is also touching the lower right intersection of the grid. As you can see, something as simple as the Rule of Thirds can produce great results!
Tai O, Hong Kong
2. Leading Lines
Imagine looking at a photograph and being instantly drawn into it, following a path that leads your eyes towards the main subject.
That’s the magic of leading lines.
Our eyes naturally follow lines, and by strategically incorporating them into your compositions, you can create visually engaging images.
Have you ever noticed how a road or a pathway seems to invite you to explore what lies ahead? Or how the curve of a river guides your gaze through the frame? These are examples of leading lines, a lot of which you’ve probably already seen on Instagram.
They act as visual cues that direct your attention and guide your eyes towards a specific point of interest within the photo.
You can experiment with different angles and perspectives to find the most effective placement of leading lines. Consider how they interact with other elements in the frame, such as the Rule of Thirds. The shot in Tao O Fishing Village combines both leading lines and the Rule of Thirds, with the fence acting as a line towards the gazebo which is the main subject of the photo.
Pro-tip: Lines coming from the corner of the frame add more dynamics into the shot.
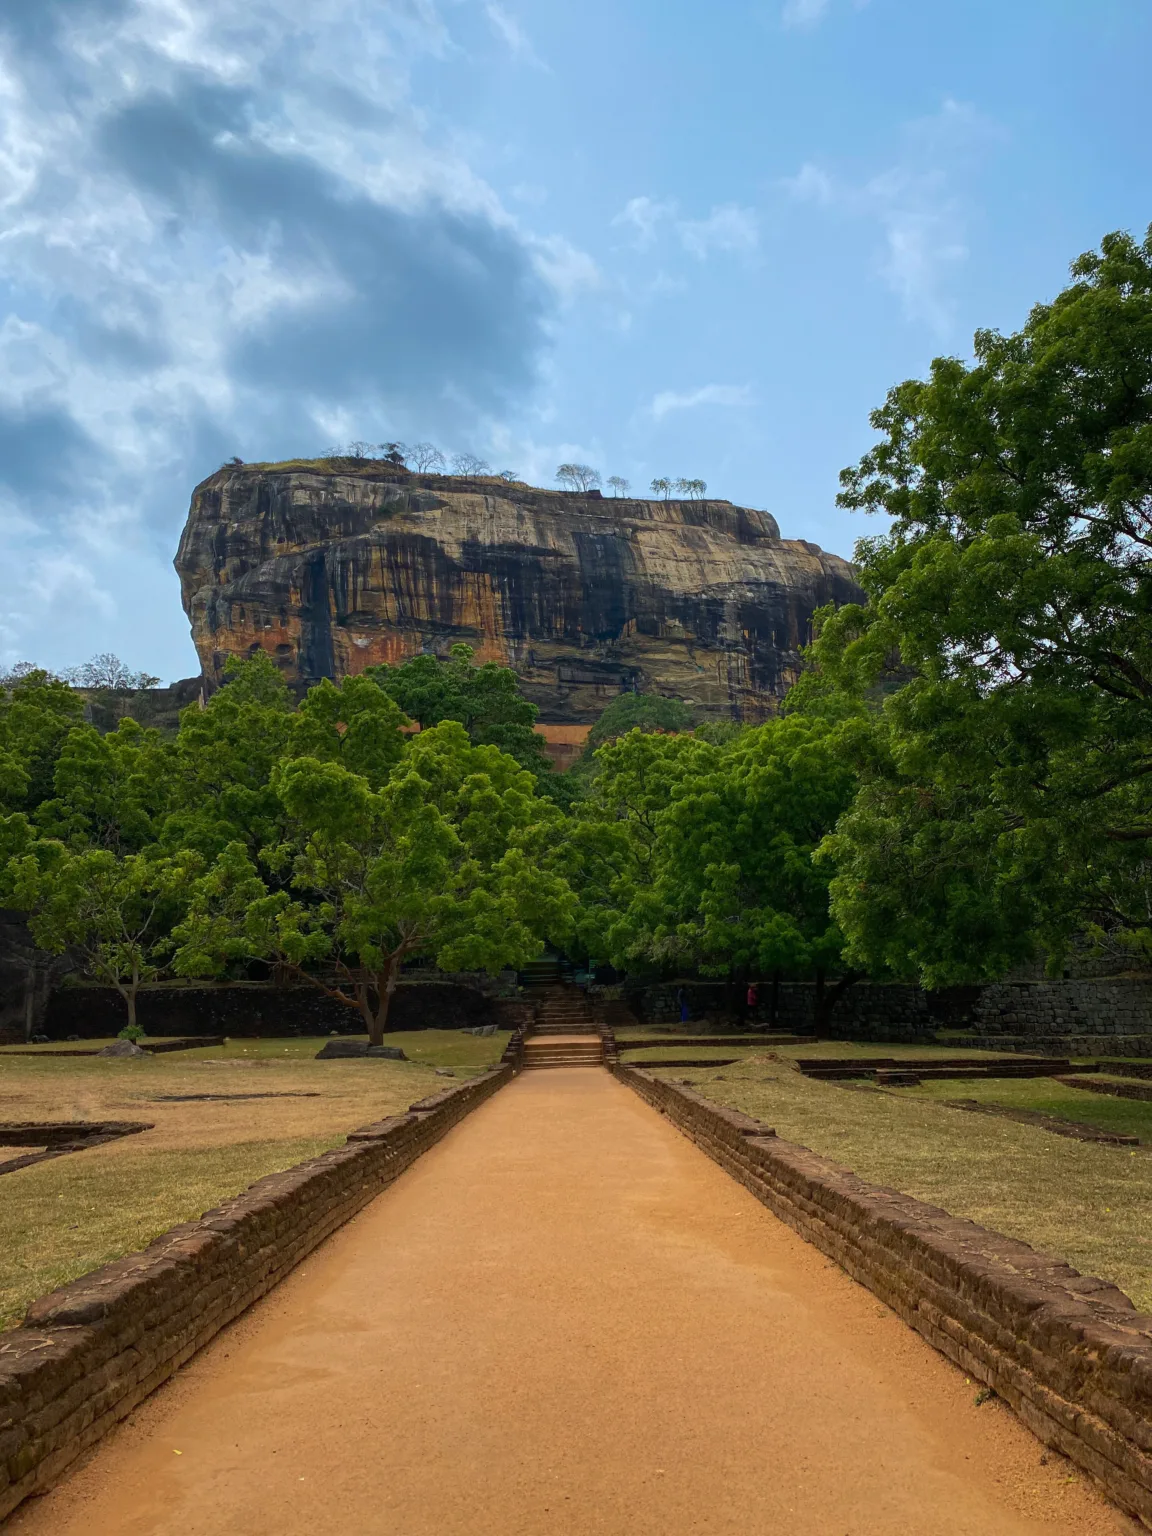
Sigiriya, Sri Lanka
Leading lines can take various forms – straight, diagonal, curved, converging – each with its own unique effect.
Straight lines convey a sense of stability and order, while diagonal lines add dynamism and energy to the composition such as the lines of the road leading up to Lion Rock in Sri Lanka.
Kinderdijk, Netherlands
Curved lines create a gentle flow, and converging lines draw your attention to a specific focal point.
In the Netherlands photo, your eyes may be drawn to the black marked road which slithers towards me while I’m heading towards the windmill, but there’s actually two more leading lines at the each side of the road forming converging lines which really adds much stronger impact. Not to mention it’s also using the Rule of Thirds, try to combine different composition techniques as you try to find your photography style.
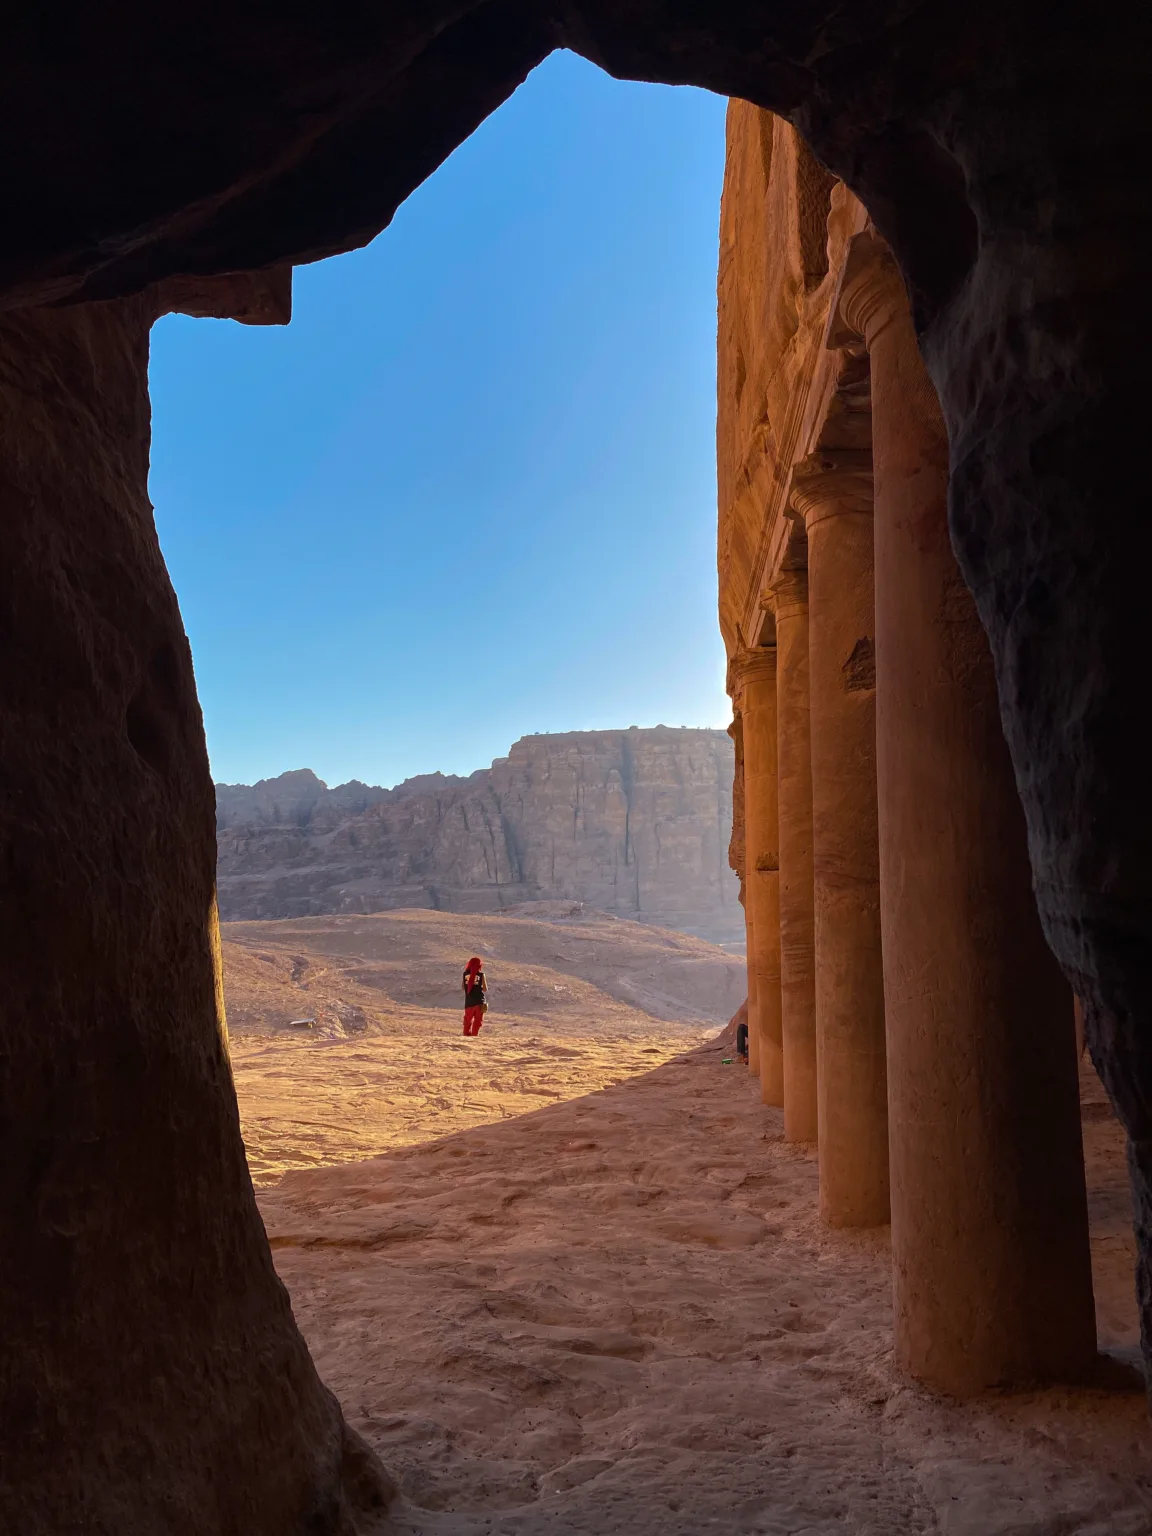
Petra, Jordan
3. Framing
Another one of my favorites and one of the easiest composition techniques to use.
Framing is pretty much just using elements within your scene to create a natural frame around your subject. Like a frame within a frame!
Imagine a window, a doorway, or even branches and foliage acting as borders around the main focal point of your photo.
By placing your subject within this frame, it helps to isolate your subject from any surrounding distractions, making it the star of the photo.
Plus, the frame itself adds a layer of context to your image. It also adds more dimensions to your image, a bit of 3D-ness if you will.
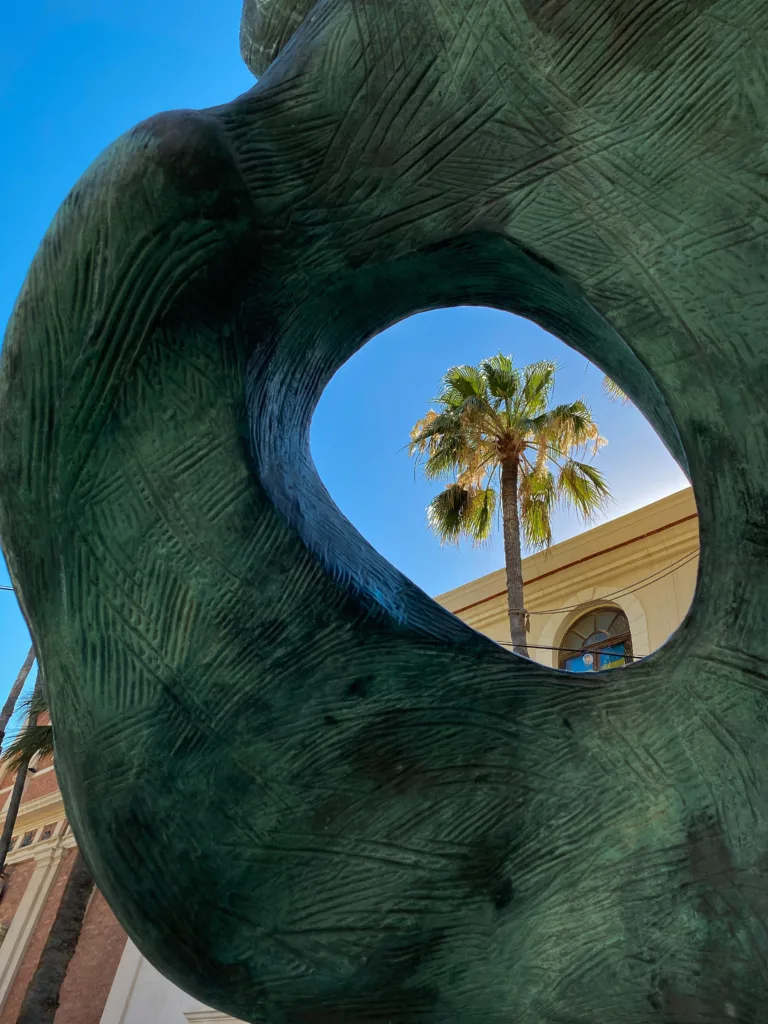
Jerusalem, Israel
Jaffa, Israel
You can get as creative as you want with framing, hone in on your photographer’s instincts and scour your surroundings on what you can use to frame your subject.
For example, I used the pillars and arch to frame the Dome of the Rock in Jerusalem, the arch matches the curvature of the dome as well creating really nice synergy.
Another shot that I took was in Israel’s ancient city Jaffa, located within Tel Aviv. Here, there was an art sculpture in front of St. Peter’s Church that had a hole in it, I simply used it to frame a random palm tree and it still turned out pretty good!
Can you imagine the difference if I just took a photo of the palm tree alone? Maybe it wouldn’t turn out to be that interesting.
Ulaanbataar, Mongolia
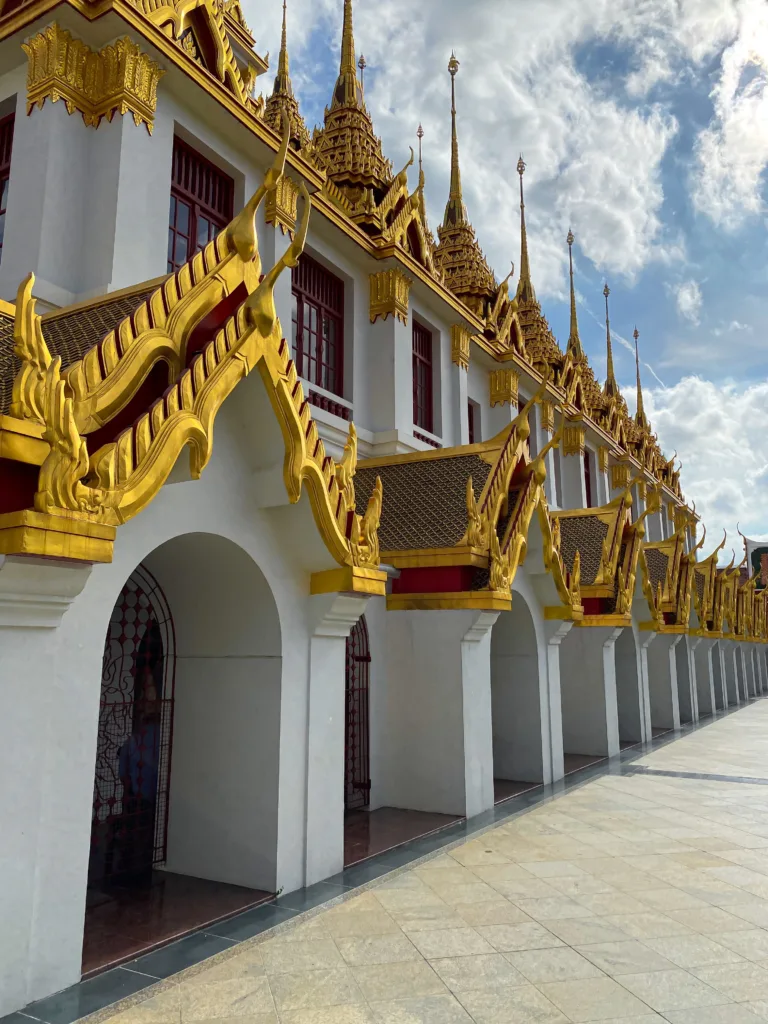
Bangkok, Thailand
Wat Benchamabophit, Bangkok
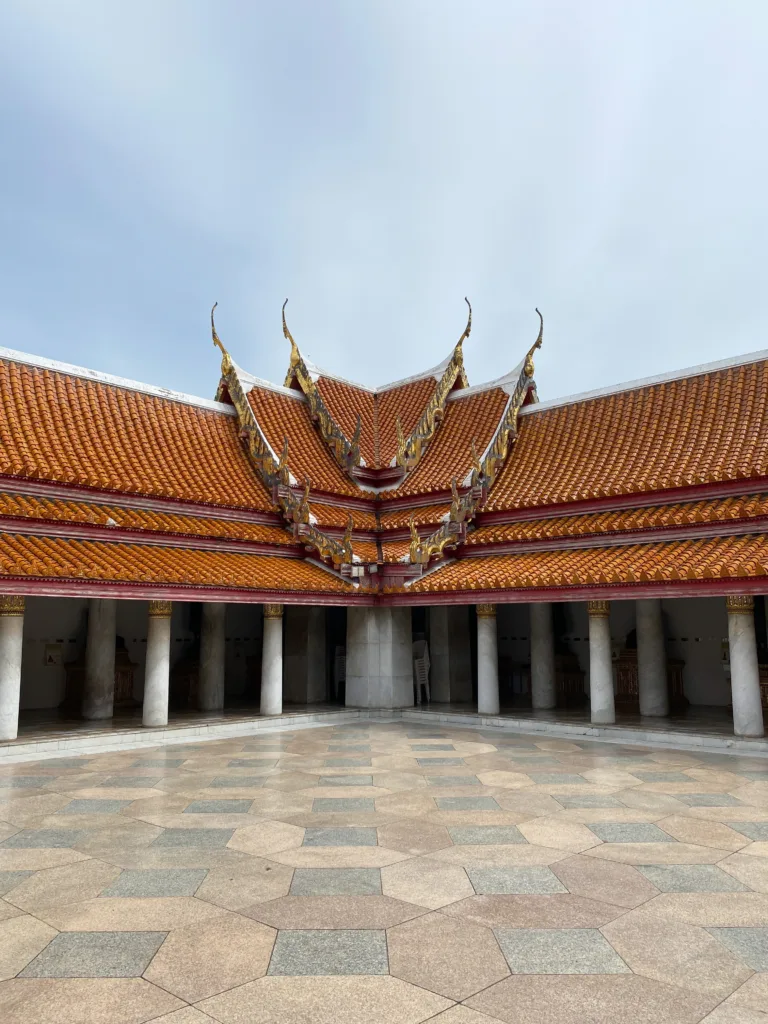
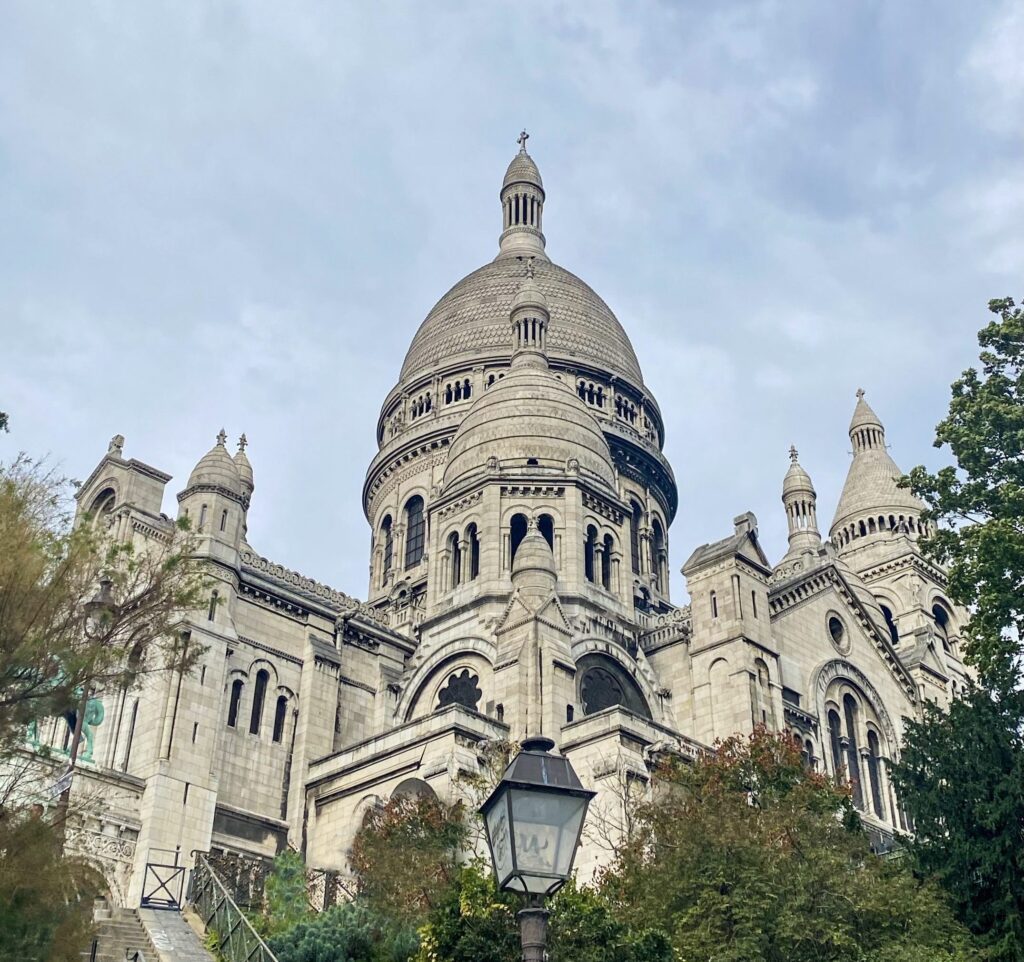
4. Symmetry
Ahh, the wonders of symmetry. As human beings, we love symmetry! When everything aligns just right, it just feels good to appreciate something perfect.
Symmetry occurs when you have a perfectly balanced arrangement of elements in your frame, often mirrored or repeated on either side of a central axis. It can be found in architecture, landscapes, and even in the natural world.
Reflections (which is another composition technique we will be covering) are one of the easiest ways to create symmetrical photos.
I’ve had a lot of fun taking symmetrical shots in Bangkok. The temples of Thailand are some of the finest pieces of architecture and it really fun to take these shots.
The key is to really make sure to use your grid in measuring which parts come into the frame as symmetry can be a double-edged sword especially for perfectionists. I really had a hard time getting the shot of Sacre Coeur just the way I wanted it and I had just found this angle by accident as I was walking around the lower backstreets of Paris.
Paris, France
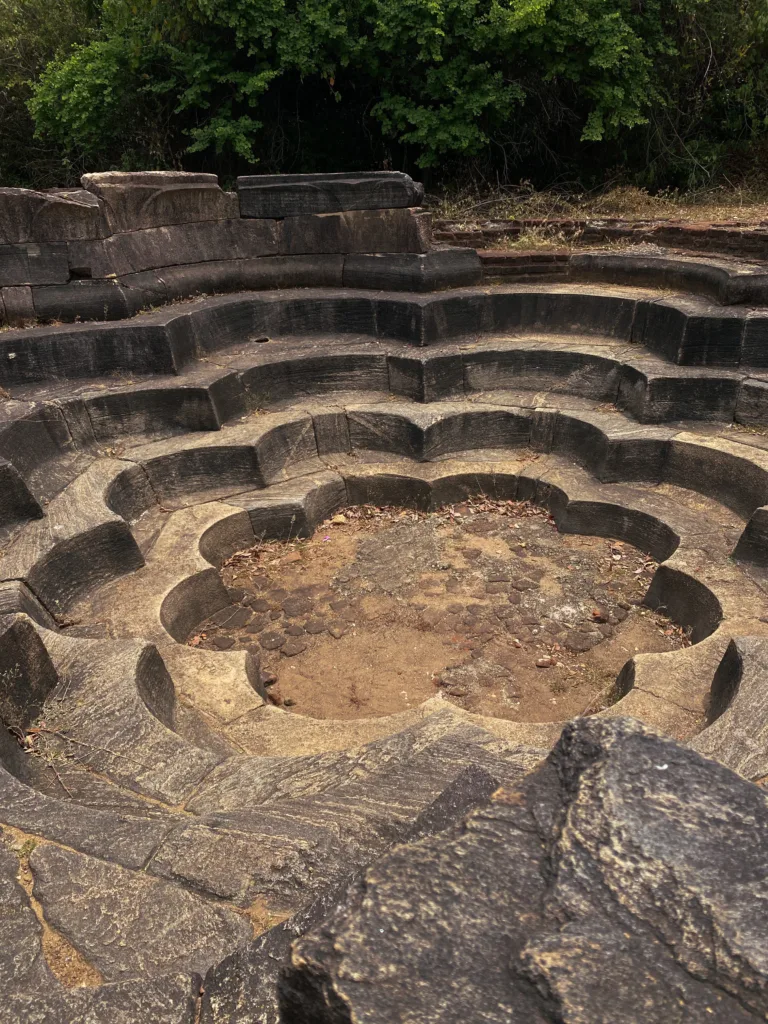
Polonnaruwa, Sri Lanka
Nelum Pokuna, Polonnaruwa
5. Patterns
Patterns exist all around us – in architecture, nature, textiles, and even in everyday objects. They can be repetitive shapes, lines, or textures that create a sense of rhythm within an image.
Why do patterns have such a powerful effect on our perception? Our brains are wired to recognize and seek patterns. When we encounter a photo with well-defined patterns, it creates a sense of familiarity and visual pleasure.
An example of a photo that utilizes pattern is one that I took in Sri Lanka’s ancient capital, Polonnaruwa. From above, the small cups form a pattern of circles around an already circular platform, creating a mesmerizing effect, if I do say so myself. The other photo was in Nelum Pokuna, also known as the Lotus Pond. This one is already quite photogenic on its own but it’s also a good example of patterns at work.
Wat Phra Kaew, Bangkok
To capture patterns in your travel photos, train your eye to spot symmetrical designs, geometric shapes, or natural textures that repeat. Experiment with different angles and focal lengths to enhance the impact of the patterns.
Maybe I went a bit overboard in capturing the patterns of the Wat Phra Kaew temple in Bangkok, they turned out to be almost fractal. Very trippy!
Saitama, Japan
You can also play with the juxtaposition of patterns. Combining contrasting or complementary patterns can add an extra layer of visual interest and complexity to your photos. Don’t be afraid to get up close and fill the frame with the patterns, or step back to include a larger scene that showcases the patterns within its context. Such as the repeating stone lanterns taken during a hike in Saitama.
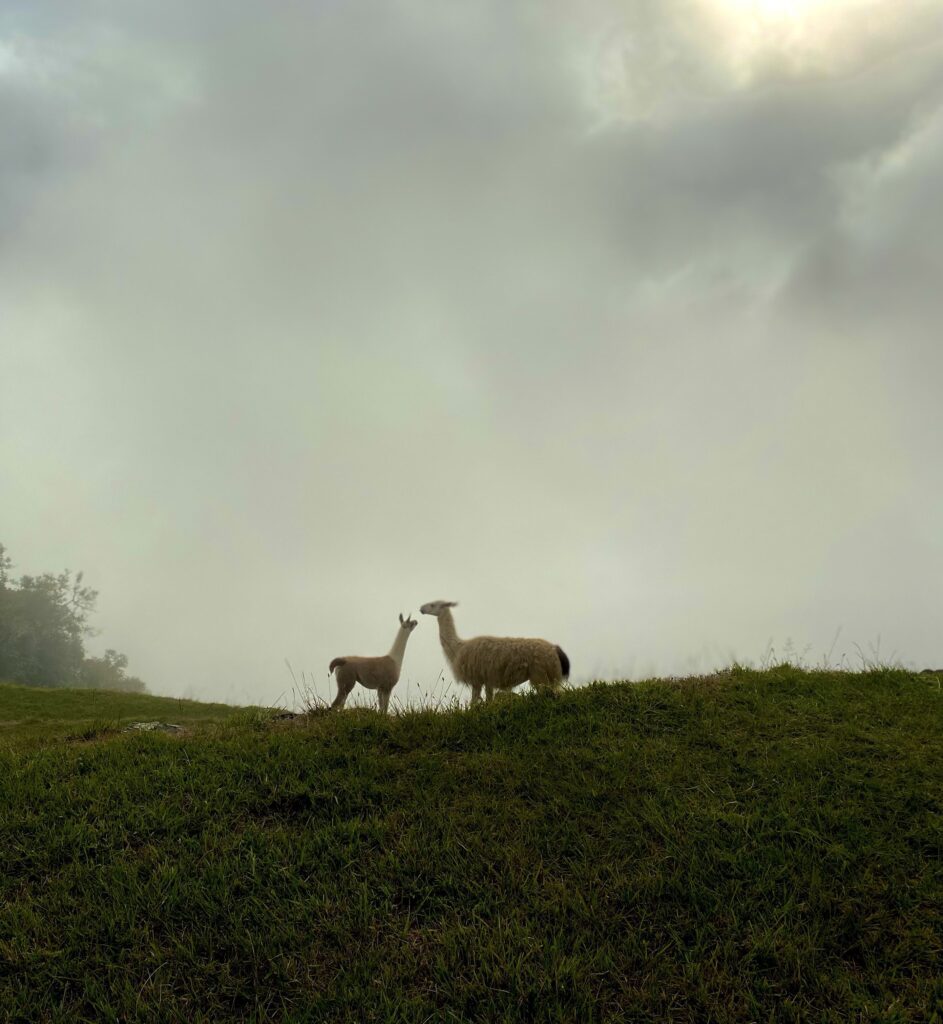
Machu Picchu, Peru
6. Negative Space
Sometimes the absence of elements can have a profound impact on an image. That’s where the power of negative space comes into play. Negative space refers to the empty or unoccupied areas surrounding the main subject in a photograph. It’s the breathing room that allows the subject to stand out and make a strong visual statement.
Negative space is not just empty space; it’s a deliberate compositional choice that can create a sense of minimalism, sometimes simple is best!
When incorporating negative space in your compositions, think of it as an active element rather than a passive background. It should be purposefully utilized to emphasize your subject and create a compelling visual narrative.
Less is often more when it comes to negative space, take for example the llamas of Machu Picchu in Peru. The morning fog had obstructed everything else in the photo which made the llamas stand out while adding a really dramatic atmosphere. The eye has nowhere else to go except towards the subject with the use of negative space.
Normandy, France
Negative space can also be used to convey a sense of vastness or isolation. Think of expansive landscapes with a small subject in the distance, or a lone figure surrounded by empty surroundings. These compositions can evoke emotions and invite viewers to contemplate the subject within the larger context.
Embracing negative space in your travel photography allows you to create visually striking and thought-provoking images. So, don’t be afraid to leave room for the empty spaces!
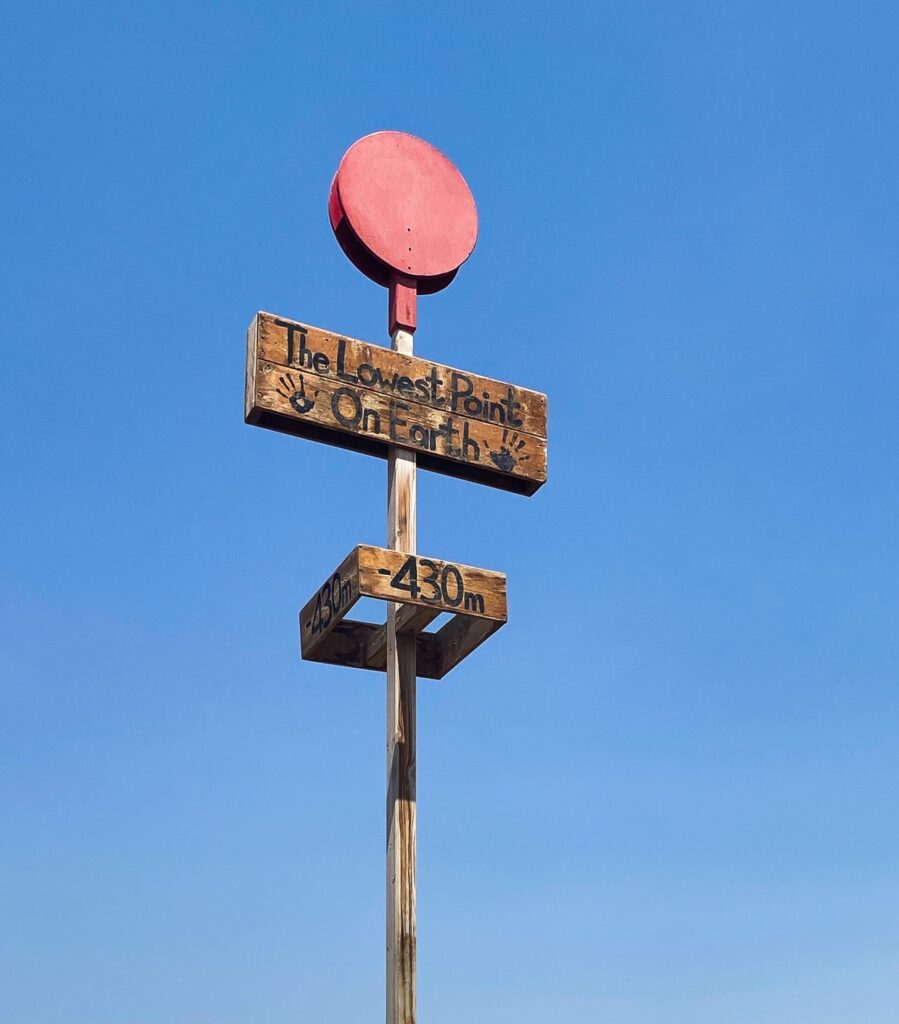
Dead Sea, Palestine
Okutama, Japan
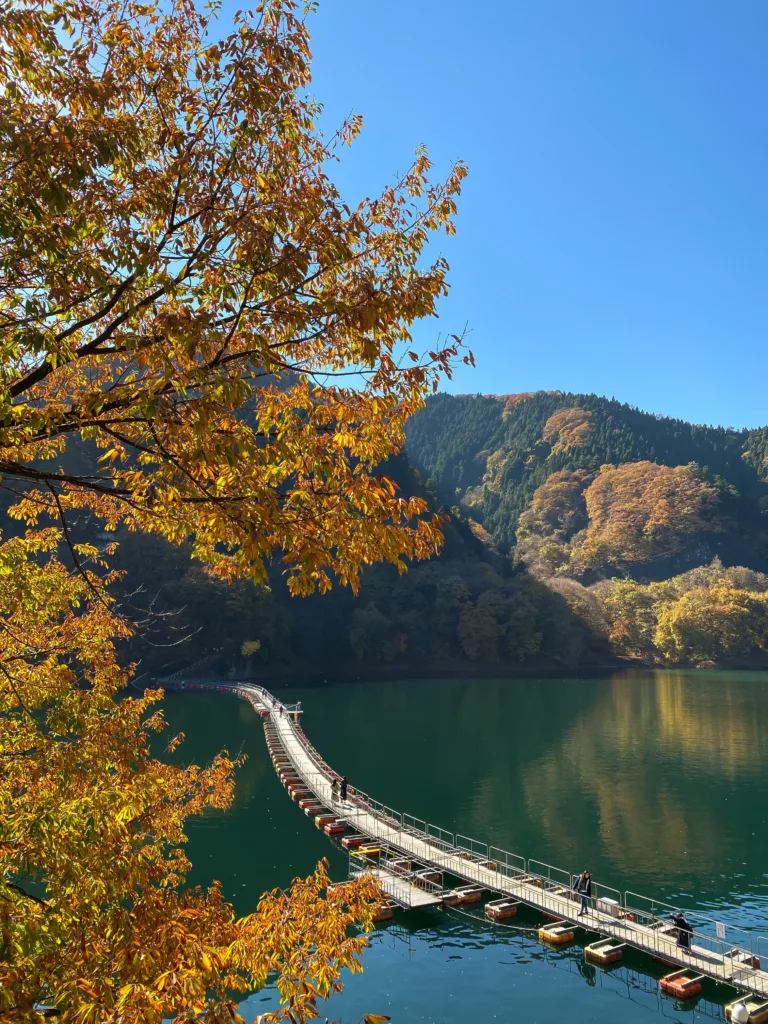
7. Layering
Layering is a technique that involves incorporating multiple planes of interest within a photograph. For me, this can simply be done by consciously adding a foreground, midground and background.
The foreground refers to the elements that are closest to the camera. It can be a prominent object, a person, or any element that grabs the viewer’s attention and helps set the stage for the overall composition. In the shot above, it would be the tree. Do you see how much depth it already adds to the photo just by being there?
The midground is the area between the foreground and background. It provides a transition space that complements the foreground and leads the viewer’s eye toward the main subject or focal point. The midground can include additional elements that enhance the story of the photograph. In this case, it will would be the Mugiyama Floating Bridge on Lake Okutama. It also functions as a nice leading line.
The background is the part of the image that extends beyond the main subject or focal point. It serves as the backdrop and context for the composition. Paying attention to the background is important because it can either support or distract from the main subject. The background in the photo above would be the autumn-painted mountains that contribute to the overall aesthetic of the shot.
Siem Reap, Cambodia
By strategically positioning objects or subjects at various distances from the camera, you can create depth and dimension in your compositions.
Layering also allows you to create visual relationships between the different elements in your composition. By carefully arranging the elements, you can establish connections, contrasts, or storytelling elements within the frame. The layering technique encourages your viewers to explore the image, moving their gaze from one layer to another and engaging with the visual narrative you’ve created.
Take for example, Ta Prohm Temple, one of the most majestic temples within Angkor Park in Siem Reap, Cambodia. Here, the foreground would be the vines, your eyes are then drawn to the temple in the midground and then to the surrounding jungle in the background. The three layers establish a sense of mysterious and ancient vibe to the shot thus creating a story.
Angkor Wat, Cambodia
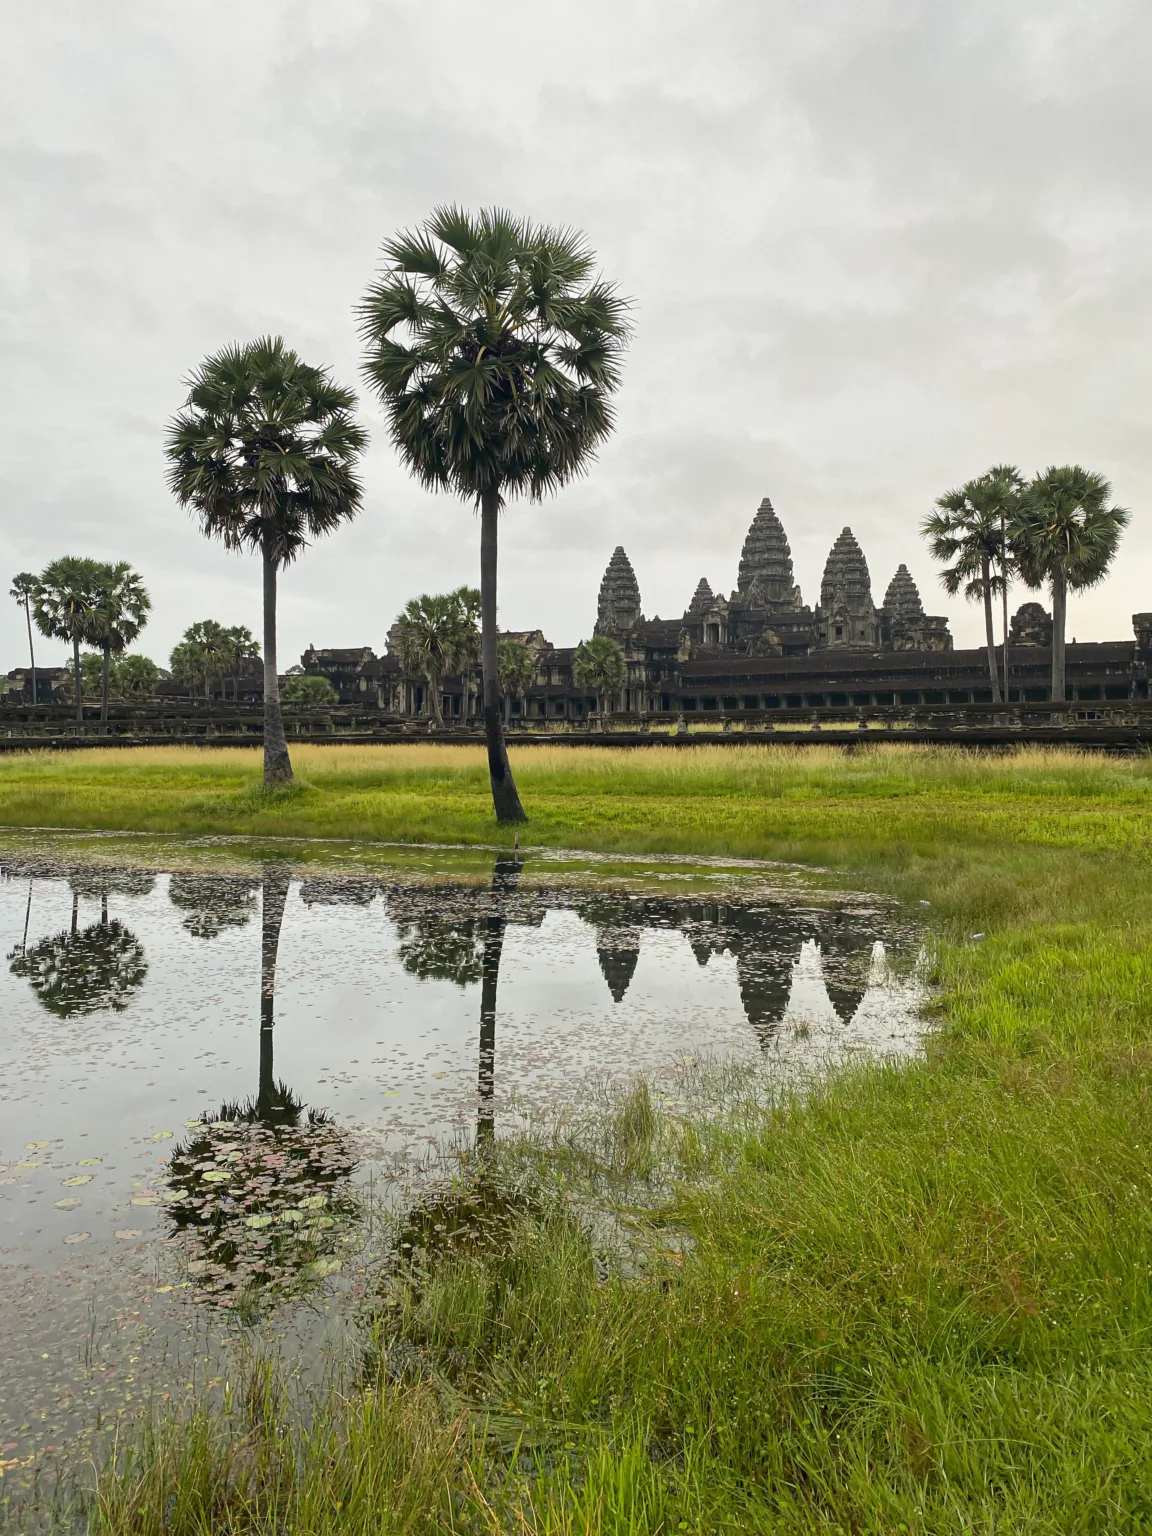
8. Reflections
Continuing on from symmetry, reflections can add a captivating and surreal quality to your images.
Reflections can be found in various settings, including bodies of water, windows, mirrors, or even polished surfaces. They offer a unique perspective by presenting a “double vision” of the subject, resulting in an intriguing visual effect.
One of my most prized shots of Angkor Wat captures its reflection on the water, the trees also form a pattern that’s increasing in size as it approaches the temple. Unfortunately, I couldn’t get the last tree in but a reflection shot doesn’t have to be symmetrically perfect.
Tokyo, Japan
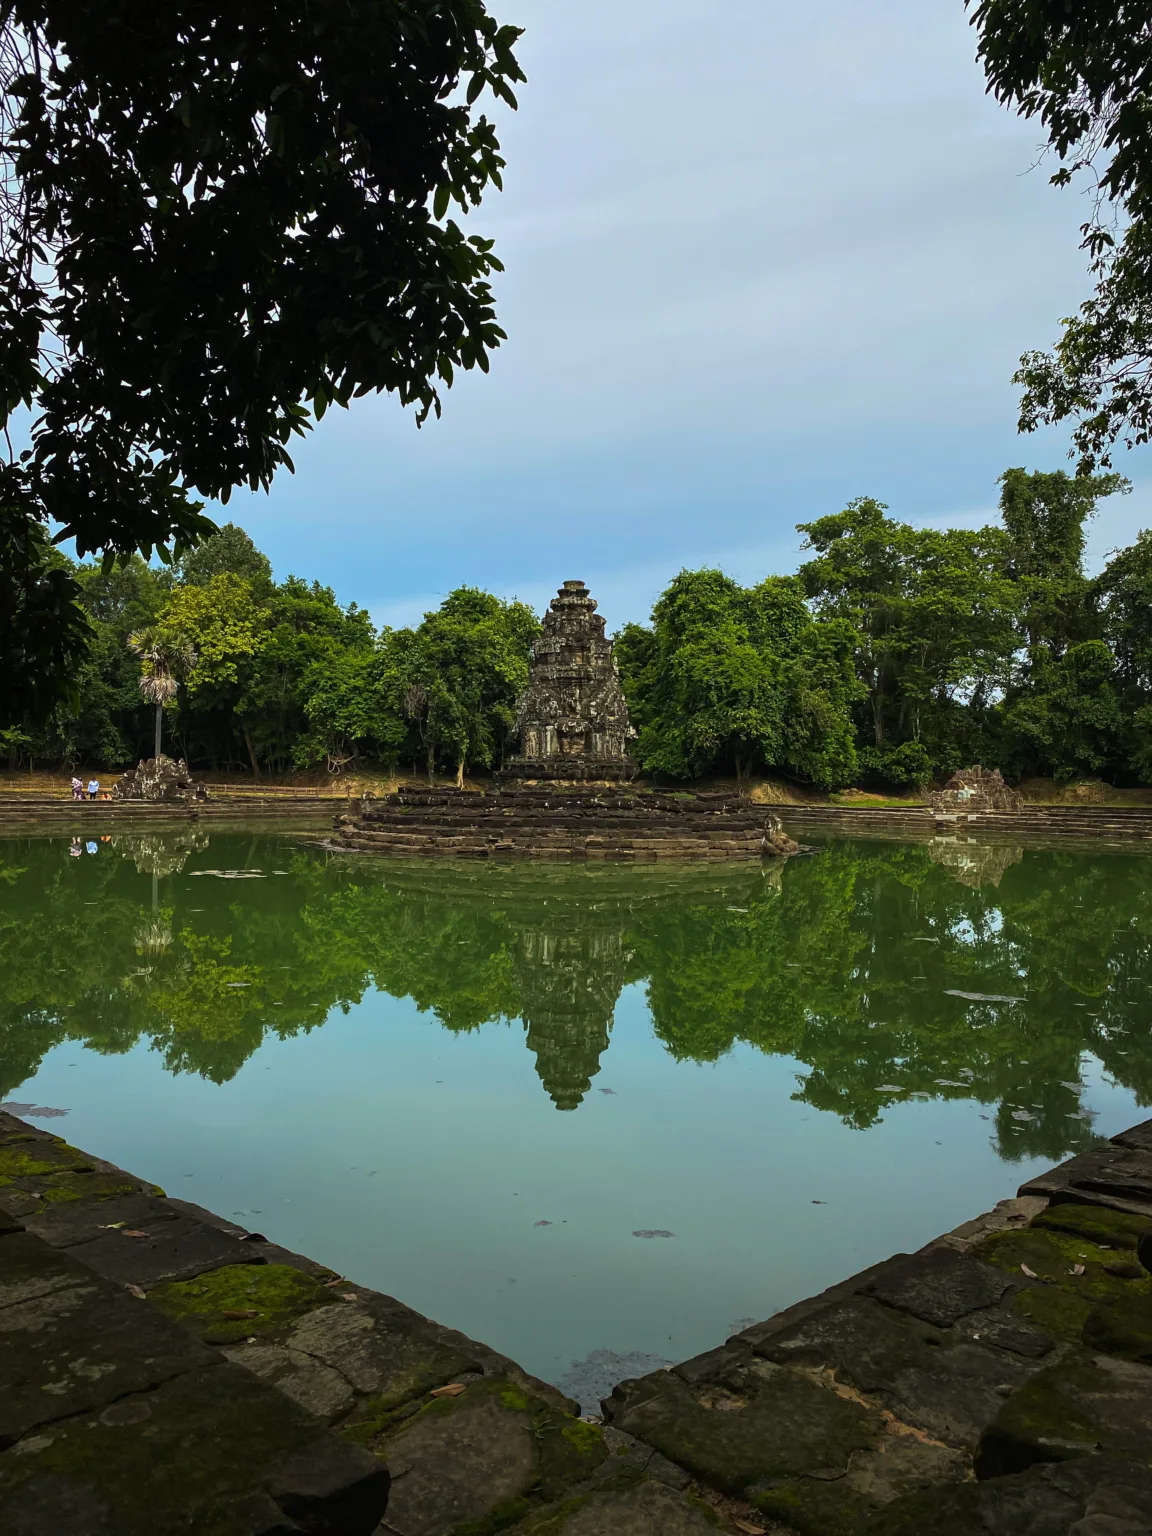
Bodies of water are some of the easiest ways to get reflection shots. Make sure the water is calm with not much wind blowing, get low and try to get a balanced shot if you can to create symmetry.
I was able to get an opportunity in Kasai Rinkai Koen’s ferris wheel in Tokyo during twilight. Another example would be Neak Pean temple in Angkor Park, which is actually quite known for having wonderful reflection photography opportunities.
Neak Pean, Angkor Park
Khongoryn Els, Gobi Desert
9. Dynamic Diagonals
The last composition technique I’d like to leave with you is something I call dynamic diagonals.
Diagonal lines have an inherent ability to create an engaging composition. By incorporating diagonal lines, you introduce a flow that can evoke a sense of drama and excitement.
Diagonals can be found naturally in various elements such as roads, staircases, buildings, tree branches, or even the body language of your subjects. They can also be created through careful positioning and framing of your shots.
See how the diagonal line of the Singing Sand Dunes create such a profound effect, it makes it look like the subject is really on a journey to reach the top! To be fair, it was actually one of the most challenging hikes I did in Mongolia.
Omnogovi, Mongolia
The beauty of dynamic diagonals lies in their ability to break away from the static and predictable nature of horizontal or vertical lines. They add a sense of dynamism, leading the viewer’s eye from one part of the frame to another, creating a visual journey within the image.
A bicycle already evokes a sense of movement in any photo, but having diagonal lines that frame and converge in the form of an arrow adds a much more captivating element to it.
Pro-tip: Whenever you have a subject facing one direction, leave more space in front of them. This technique, known as “leading space,” helps to create visual anticipation to your composition.
Conclusion
Well I hope you enjoyed this crash course on photography composition. As you have seen, even just an iPhone can create really powerful photos, all you need to do is learn photography composition to create fantastic photos that tell a story.
There are still plenty of photography composition techniques to discuss but just working on mastering a few at a time can be a great way to not get overwhelmed. The ones I shared here today are some of the most-widely used and easy to implement.
I’m also planning on creating a photography course that goes more in-depth, so hopefully I can create something that helps a lot more people!